Monday, March 21, 2011

We used rigid fiberglass (duct board) to insulate our foundation.  Extruded polystyrene is not allowed for this application in the southeast due to termites.  Since the cement slab will serve as the majority of our thermal mass it's crucial that we insulate it from the outside air.

Post pillars for our portico

We made certain to air seal with caulk in even the hard to get to seams like where the wall sheathing laps over the top of the stem wall.

Here we are adding the ledger boards for our back screen porch rafters.

The chimney block is going up for the wood stove flue.

The portico takes shape.

Cement fiber siding going up (no, the house will not be yellow .  Durability and longevity are key qualities of any efficient home.

Here's the south face of the home after the majority of trim and siding has been applied.  Note that the rigid fiberglass on the foundation wall is covered with vinyl flashing.  This will keep it dry (crucial to maintain r-value), keep insects out (crucial for longevity), and keep the wind off the insulation so it can perform.

North side of the home.  Note the limited windows.  This is done intentionally when drawing the floor plan.  By locating closets, bathrooms, etc. on the north wall we're greatly increasing the home's performance.  No matter the window, windows always have a significantly lower r-value than the wall.  North facing windows provide no solar gain and only lose heat from the living space.

Wednesday, February 23, 2011

Shell Dry-in

Floor sheathing goes down on the second level.


The wall braces are long enough (12') that we can cut the ends off and use the unaffected middle sections (8') for interior framing.

The view from our future staircase.  One big advantage to building on an "infill site" (an existing space among an older development) is that you often have mature trees around the house site.  In this case our oak grove will provide a cool micro-climate in our front yard during the hot summer months.  This is much nicer than a typical development that cuts down all of the mature trees for expediency, landscapes with saplings, then names the subdivision and roads after the trees they destroyed.  It takes decades for the saplings in these situations to reach a size that provides meaningful shade.


Another beautiful sunset over southern Appalachia.


Getting the Typar on the roof allows us to breathe deep and know the building is protected from the elements.  Note that the windows visible in this picture account for over 90% of the windows in the building.  This is done intentionally as even the best windows pale in comparison to the walls in terms of insulation value.  Every effort should be made to orient well-tuned windows south while minimizing glass elsewhere except where legal egress, ventilation,  and daylight are necessities.  Even daylight can be brought in more efficiently on the north side using "tubular" skylights (more on this later).  Operable window units were used where ventilation is desired while others are inoperable to achieve a tighter building envelope.  All windows will be properly shaded for passive cooling.  On December 21st these windows will receive full sun.  On June 21st they will receive no direct sunlight.  Every day in between will be a relative variation.  This is due to the angle of the sun's arc through different seasons and the geometry of our window awnings and window sizing/placement.  It sounds complicated but a couple hours with a scratch pad, google, and a calculator work wonders.

Sunday, February 6, 2011

Walls and Roof Trusses

 Click here to watch video of a Wall Panel being errected


The upper floor's wall sections are braced to the subfloor.

Note that the upper floor's windows are shorter than downstairs.  To maintain the proper glass-to-mass ratio these windows need to be smaller to avoid overheating (wood floors upstairs vs. the relatively high thermal mass cement floor downstairs).
Engineered roof trusses with a 5/12 pitch.


The first 2nd floor wall section is lifted into place.

Each wall section for the crescent shaped portions has the 30 degree bevel cut into it already. 

The 24" stud spacing of 2x6 studs allows much more space for insulation (both width and depth).  Fewer studs mean less "thermal bridging".  Though wood does not conduct heat nearly as well as other materials like metals it does eventually conduct heat out of the building envelope.  This is the reason for a layer of extruded polystyrene outside of the sheathing.  The foam breaks that thermal bridge making the entire wall far more efficient.

Thursday, February 3, 2011

Shell Set

Control joints are cut into the slab.

The wall panels are assembled off-site in a controlled environment by computer.  This virtually eliminates wood waste and allows for faster on-site construction with less site disturbance.


A thick bead of glue is put down under and in between each wall panel.  This is an important measure against air infiltration that can't be done after the fact.  We'll caulk as well but having that continuous barrier is key.

Every wall section's sheathing extends down past the top of the stem wall.

The windows extend very near to the floor to bath more of the slab in winter sun.  The operable portion is located by the floor.  This allows us to cool the slab with cross ventilation during summer evenings.  The inoperable picture window above has better air sealing than a similar operable window.

Because the cement slab will serve as our finished floor we braced the wall sections from the outside.

The vast majority of the windows are clustered on the south side of the building.  This requires a floor plan with closets, bathrooms, utility areas, etc. along the north wall so that the living spaces are day lit.  The windows are "tuned" so that those facing south have a higher "Solar Heat Gain Coefficient" (0.5 to 0.7 vs. 0.3 in a typical modern window unit).  This results in a much larger percentage of the infrared spectrum reaching the thermal mass inside the building envelope.

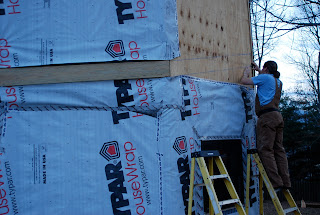
The entire house has an inch of extruded polystyrene foam between the sheathing and house wrap.  This creates a "thermal break" so that the framing cannot conduct nearly as much heat out of the house.  Though the foam has an r-value of 5 its function as a thermal break increases the insulation value of the wall exponentially.  The house wrap allows water vapor to escape while keeping liquid moisture out.  Think of it as a "gore-tex" house (like an expensive pair of boots you can live in).

The floor trusses for the second floor are "web-trusses".  These allow for easy plumbing, wiring, and HVAC runs.  They also allow for long load bearing spans without the use of large beams (think old-growth trees).

Tuesday, February 1, 2011

Continuation of Foundation Construction


Block stem-wall for slab.


The long east-west axis of the house faces five degrees west of due-south to take best advantage of the site's solar window.


Plumbing rough-in.  The plumbing was "stacked" on the floor plan to limit cost and distances from the water heater.  All supply lines are insulated.

Materials are staged.

Wild cherry felled from the building site and milled for later use as bookcase facing.


Installation of radon mitigation system (just in case).


The area inside the stem-wall is filled with pea-gravel and thoroughly compacted.

Since the finished slab will account for the majority of the thermal mass inside the building envelope it's really important to create a "thermal break" between it and everything outside.  Unfortunately physics dictate that the load needs to be carried straight through the stem-wall to the footers without any insulating material in between.  Despite this it's still possible to insulate the stem-wall from the outside air with rigid fiberglass (termite-proof) and from the inside of the slab with R-10 extruded polystyrene.   This will provide enough separation that the slab can act like a battery storing solar warmth throughout the day and releasing it throughout the night.

The footers for the support columns were poured to a precise depth to allow for insulation right up to the posts (as opposed to only insulating up to the outside edge of the footers).


The entire slab will have 2" of extruded polystyrene underneath.  And no, Lowes is not a sponsor of this blog.  We just happened to have a coupon.


Where the horizontal layer of slab insulation overlapped the vertical stem-wall insulation we cut a line 2" inside to eliminate any small voids between the extruded foam and the gravel base.  This will prevent settling later on.  In retrospect we would have simply positioned the stem-wall insulation right up to the lip of the deep-cut chair block rather than leaving it 2" below.  This would have eliminated a step.  Hind-sight is 20-20.

Another gorgeous day on the job site.

The cement for our slab has a higher concentration of fly-ash mixed into it.  This provides a superior mix while entombing waste from coal-fired power plants.  We also upped the strength to 4000 pounds per square inch since the slab will be our finished floor.  Its important that the slab be exposed for solar heat gain.  We will acid-etch and seal it for beauty but carpet, hardwood, etc. would defeat it's use as thermal mass for a "fly-wheel" effect.

A thing of beauty!

Saturday, January 22, 2011

Site Prep

The building site facing south-southwest
Our mature crop of exotic invasive plants metastasizing from our neighbor's woods (Oriental Bittersweet, Japanese Privet, and Japanese Honeysuckle) 
Fence row after eradication of exotic plants


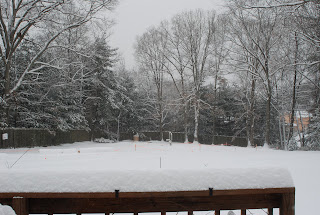
The snowstorm that graced our yard the week we hoped to break ground.


Let the grading begin!


Our poor driveway!


Excavation for the footers.

Steel reinforcement for the concrete footer, sleeve for the water line, and a temporary water spigot for the block masons.


Footers are marked with nails by the surveyors for the block mason's reference.